#gmail IMAP settings
Explore tagged Tumblr posts
Visit Tumblr Blog
Explore Tumblr blogs with no restrictions, modern design and the best experience.
Last Seen Tumblr Blogs


Fun Fact
The “We are the 99%” Tumblr blog became the slogan for the Occupy Wall Street movement.
Text
Updated Personal Infosec Post
Been awhile since I've had one of these posts part deus: but I figure with all that's going on in the world it's time to make another one and get some stuff out there for people. A lot of the information I'm going to go over you can find here:
https://www.privacyguides.org/en/tools/
So if you'd like to just click the link and ignore the rest of the post that's fine, I strongly recommend checking out the Privacy Guides. Browsers: There's a number to go with but for this post going forward I'm going to recommend Firefox. I know that the Privacy Guides lists Brave and Safari as possible options but Brave is Chrome based now and Safari has ties to Apple. Mullvad is also an option but that's for your more experienced users so I'll leave that up to them to work out. Browser Extensions:
uBlock Origin: content blocker that blocks ads, trackers, and fingerprinting scripts. Notable for being the only ad blocker that still works on Youtube.
Privacy Badger: Content blocker that specifically blocks trackers and fingerprinting scripts. This one will catch things that uBlock doesn't catch but does not work for ads.
Facebook Container: "but I don't have facebook" you might say. Doesn't matter, Meta/Facebook still has trackers out there in EVERYTHING and this containerizes them off away from everything else.
Bitwarden: Password vaulting software, don't trust the password saving features of your browsers, this has multiple layers of security to prevent your passwords from being stolen.
ClearURLs: Allows you to copy and paste URL's without any trackers attached to them.
VPN: Note: VPN software doesn't make you anonymous, no matter what your favorite youtuber tells you, but it does make it harder for your data to be tracked and it makes it less open for whatever public network you're presently connected to.
Mozilla VPN: If you get the annual subscription it's ~$60/year and it comes with an extension that you can install into Firefox.
Mullvad VPN: Is a fast and inexpensive VPN with a serious focus on transparency and security. They have been in operation since 2009. Mullvad is based in Sweden and offers a 30-day money-back guarantee for payment methods that allow it.
Email Provider: Note: By now you've probably realized that Gmail, Outlook, and basically all of the major "free" e-mail service providers are scraping your e-mail data to use for ad data. There are more secure services that can get you away from that but if you'd like the same storage levels you have on Gmail/Ol utlook.com you'll need to pay.
Tuta: Secure, end-to-end encrypted, been around a very long time, and offers a free option up to 1gb.
Mailbox.org: Is an email service with a focus on being secure, ad-free, and privately powered by 100% eco-friendly energy. They have been in operation since 2014. Mailbox.org is based in Berlin, Germany. Accounts start with up to 2GB storage, which can be upgraded as needed.
Email Client:
Thunderbird: a free, open-source, cross-platform email, newsgroup, news feed, and chat (XMPP, IRC, Matrix) client developed by the Thunderbird community, and previously by the Mozilla Foundation.
FairMail (Android Only): minimal, open-source email app which uses open standards (IMAP, SMTP, OpenPGP), has several out of the box privacy features, and minimizes data and battery usage.
Cloud Storage:
Tresorit: Encrypted cloud storage owned by the national postal service of Switzerland. Received MULTIPLE awards for their security stats.
Peergos: decentralized and open-source, allows for you to set up your own cloud storage, but will require a certain level of expertise.
Microsoft Office Replacements:
LibreOffice: free and open-source, updates regularly, and has the majority of the same functions as base level Microsoft Office.
OnlyOffice: cloud-based, free
FreeOffice: Personal licenses are free, probably the closest to a fully office suite replacement.
Chat Clients: Note: As you've heard SMS and even WhatsApp and some other popular chat clients are basically open season right now. These are a couple of options to replace those. Note2: Signal has had some reports of security flaws, the service it was built on was originally built for the US Government, and it is based within the CONUS thus is susceptible to US subpoenas. Take that as you will.
Signal: Provides IM and calling securely and encrypted, has multiple layers of data hardening to prevent intrusion and exfil of data.
Molly (Android OS only): Alternative client to Signal. Routes communications through the TOR Network.
Briar: Encrypted IM client that connects to other clients through the TOR Network, can also chat via wifi or bluetooth.
SimpleX: Truly anonymous account creation, fully encrypted end to end, available for Android and iOS.
Now for the last bit, I know that the majority of people are on Windows or macOS, but if you can get on Linux I would strongly recommend it. pop_OS, Ubuntu, and Mint are super easy distros to use and install. They all have very easy to follow instructions on how to install them on your PC and if you'd like to just test them out all you need is a thumb drive to boot off of to run in demo mode. For more secure distributions for the more advanced users the options are: Whonix, Tails (Live USB only), and Qubes OS.
On a personal note I use Arch Linux, but I WOULD NOT recommend this be anyone's first distro as it requires at least a base level understanding of Linux and liberal use of the Arch Linux Wiki. If you game through Steam their Proton emulator in compatibility mode works wonders, I'm presently playing a major studio game that released in 2024 with no Linux support on it and once I got my drivers installed it's looked great. There are some learning curves to get around, but the benefit of the Linux community is that there's always people out there willing to help. I hope some of this information helps you and look out for yourself, it's starting to look scarier than normal out there.

#infosec#personal information#personal infosec#info sec#firefox#mullvad#vpn#vpn service#linux#linux tails#pop_os#ubuntu#linux mint#long post#whonix#qubes os#arch linux
79 notes
·
View notes
Text
Taking another look at Mastodon

I talked a bit about Mastodon last year, right as the big migration from Twitter was underway. There's a lot that has changed since then, including some of my own opinions.
First, I'm getting the definitions out of the way. Mastodon is an open-source and federated social media network. "Federated" means it's made up of a bunch of independent but interconnected servers. Those servers use a protocol called ActivityPub to talk to each other, like how Gmail and Yahoo can send and receive emails between each other with IMAP. Other social media platforms use ActivityPub too, like PixelFed, which are collectively referred to as "the Fediverse."
According to FediDB, a service set up by PixelFed developer Daniel Supernault (dansup), there are somewhere around 7.5 million Mastodon accounts spread across over 12,000 servers. Roughly 1.2 million of those accounts are active users (have posted in the past month), which is down slightly from the start of the year. The last peak was in February 2023, when the platform was around 1.68 million active users.

That's only part of the puzzle, though. Other software like Misskey, PeerTube, Calckey, and PixelFed are part of the same larger Fediverse network, adding more users into the mix.
The most significant event this year so far for Mastodon and other Fediverse platforms has been Reddit's collapse, as it pushed through similar API lockdowns as Twitter. Reddit isn't quite as terrible as Twitter yet, but Reddit's CEO continuously saying the dumbest shit possible is not helping. Several Reddit communities are migrating to Lemmy and Kbin, both of which support ActivityPub, which means they are intercompatible with Mastodon and other Fediverse software.
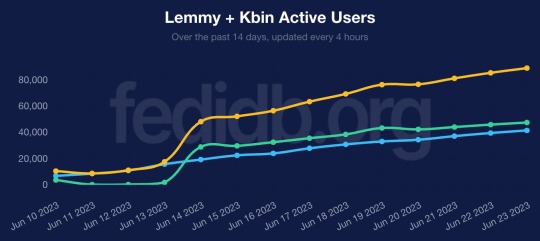
If we look at FediDB again, Lemmy and Kbin are getting close to 100,000 active users, an increase of roughly 10x since the start of the month. That's pretty remarkable, especially considering both projects are far less mature than Mastodon and options for mobile apps are limited. It remains to be seen if we'll see Reddit app developers embrace these new platforms in the same way that some popular Twitter client developers did -- the only example I've seen so far is the Sync for Reddit developer working on a Lemmy client.
The next big event will likely be the launch of Meta's Twitter clone, which will probably be called "Threads," and is expected to use ActivityPub at some point. Whenever that happens, Meta's service will probably very quickly become the top server in the Fediverse ecosystem. Most of the responses to this have been in one of three camps: "this is a good thing because the Fediverse will have more users", "we should be cautious about this", and "Meta will ruin everything we've built and we're blocking them."
To be clear, that last option is usually referring to defederation: when a Mastodon/Fediverse server completely blocks all communication with a specific other server. If you're following someone on a server, and your admin defederates the server, you don't follow them anymore and can't re-follow them. This is a pretty frequent action with servers hosting illegal content or no user moderation. When the far-right social media platform Gab introduced ActivityPub support, pretty much every Mastodon server defederated with it.
I don't really know where I stand on defederating Meta's service, because we don't have all the details yet, but I can understand where people are coming from with an outright block. The Fediverse is full of people who have been pushed away or suddenly banned from Meta-owned platforms or other big social networks (LGBTQ+ people, journalists, sex workers, etc.), and those companies generally have moderation policies that are farther to the right of most Mastodon servers. It's not difficult to see a reality where user reports about posts and users on Meta's server might overwhelm Mastodon moderators, who then simply ban Meta's server instead of continuing to deal with its users. Meta also now officially allows COVID-19 misinformation, and isn't pushing back on election interference lies.
The discourse around Meta's platform, some other Fediverse drama, and the continued onboarding issues with Mastodon do make me think that Mastodon and other Fediverse platforms probably won't ever "go mainstream," which seemed more likely to me at the end of last year. There's a lot of people who completely zone out when you have to explain how servers work, or why you can't favorite a post without copying and pasting a link, or something else like that. I do still think a lot of the people raising those points are being disingenuous, and they aren't entirely the fault of the projects (you're working against years of learned behavior about centralized platforms), but that doesn't make them invalid.
However, I do think Mastodon and other Fediverse platforms are now set up for long-term success. The big migration from Twitter gave it more name recognition, a lot more apps, and support from mainstream social media tools like Buffer and WordPress Jetpack. If I'm a big company, organization, or news site, it's now so much easier to maintain a presence on Mastodon (and thus, the rest of the Fediverse) than it was a year ago. With tools like Buffer, Mastodon is just another button you click, right next to the Twitter and Facebook buttons. That's huge.
Right now, the Fediverse is basically the desktop Linux of social media. It's not mainstream, and probably won't ever be, but it's grown enough now that it can't be completely ignored anymore. Just like the Linux userbase, the Fediverse community leans more towards tech people, but there are also a lot of guys, gals, and non-binary pals on Mastodon who have other interests and are there because they just like the experience.
I'll miss the Twitter of the past, and I will miss a few very specific and small parts of Reddit, but it's so exciting to watch Mastodon and other federated social media adapt to the failure of centralized platforms. There's still a lot more work to be done, but if Twitter, Reddit, and Facebook are any indication, "going mainstream" isn't the right goal.
2 notes
·
View notes
Text
Effective Strategies for Monitoring Your Gmail Messages Without Hassle Gmail is a powerful tool, and one of its advantages is the ability to monitor the flow of messages without the need for complex external programs. If you want to monitor your messages for security, productivity, or curiosity, there are several strategies you can easily implement.
One of the most effective is to use automatic labels and filters. You can configure them so that all emails that meet certain criteria—such as sender, subject, or keywords—are automatically flagged, archived, or forwarded. This allows you to follow specific conversations or topics more easily.
Another way to monitor them is to enable automatic forwarding to another account. From Gmail settings, in the "Forwarding and POP/IMAP" section, you can add another address that will receive a copy of each incoming message onlyfans. This feature is useful if you want to read emails from different accounts or share them with someone else.
You can also use the advanced search feature to review old messages by date, size, recipient, or specific keywords. This helps you keep a more detailed track without wasting time checking email after email.
For those looking for more specific statistics, there are tools like Clean Email or Gmelius, which offer analysis of your email habits, peak activity times, and alerts when there are unanswered messages. Although some of these features require a fee, they also offer free versions with basic monitoring options.
Don't forget to periodically review your Google account's security activity. There you can see which devices have logged in and what changes have been made. If you detect any activity you don't recognize, it's important to change your password immediately.
Gmail offers many ways to actively monitor your inbox. With a little organization and the right tools, you can monitor your messages and protect your information effectively and easily.

0 notes
Text
#erp#erp software#erp system#erpnext#logistics#softwaredevelopment#custom software development#stackerbee#custom software services
0 notes
Text
youtube
How to connect Hostinger Business email to Gmail account in 2025 ?
Connecting your Hostinger Business Email to your Gmail account allows you to send and receive emails from your business email through Gmail. Here's a step-by-step guide:
Step 1: Enable IMAP in Hostinger
Log in to your Hostinger account.
Go to the Emails section and select your domain.
Under Email Accounts, ensure IMAP/SMTP access is enabled.
Note down the following details:
IMAP Server: imap.hostinger.com
SMTP Server: smtp.hostinger.com
IMAP Port: 993 (SSL/TLS enabled)
SMTP Port: 465 (SSL/TLS enabled)
Email Address: Your business email
Password: Your business email password
Step 2: Log in to Gmail
Open Gmail and log in to your account.
Click the gear icon in the top-right corner and select See all settings.
Step 3: Add Your Hostinger Email Account
Go to the Accounts and Import tab.
Under Check mail from other accounts, click Add a mail account.
Enter your Hostinger business email and click Next.
Choose Import emails from my other account (POP3) and click Next.
Step 4: Configure POP3 Settings
Enter the following:
Username: Your Hostinger business email.
Password: Your email password.
POP Server: pop.hostinger.com
Port: 995
Check these boxes:
Always use a secure connection (SSL).
Label incoming messages for better organization.
Leave a copy of retrieved messages on the server (optional).
Click Add Account.
Step 5: Configure SMTP for Sending Emails
After adding the account, Gmail will ask if you want to send emails as your Hostinger address. Click Yes.
Enter the following:
SMTP Server: smtp.hostinger.com
Port: 465
Username: Your Hostinger business email.
Password: Your email password.
Check Secured connection using SSL and click Add Account.
Step 6: Verify Your Email
Gmail will send a confirmation email to your Hostinger account.
Open the verification email (via your Hostinger webmail or Gmail) and click the verification link.
Step 7: Test the Setup
Send a test email from Gmail using your Hostinger business email.
Ensure you can send and receive emails without issues.
0 notes
Text
BT.com Email: Complete Guide to Access, Manage, and Secure Your BT Mail Account

BT.com email, offered by British Telecom (BT), is a highly secure and reliable email service used for both personal and professional communication. With features such as spam filtering, email management, and strong security protocols, BT.com email helps users stay organized and safe. In this comprehensive guide, we will walk you through the process of logging into your BT.com email account, troubleshooting common issues, and securing your account to ensure a smooth and hassle-free email experience.
What is BT.com Email?
BT.com email is an email service provided by British Telecom, offering email addresses such as @btinternet.com and @btopenworld.com. The service is designed to help users manage their emails securely with features like spam protection, virus scanning, and personalized settings. It is one of the most trusted email services in the UK, ideal for both personal and business communication.
How to Log In to BT.com Email?
To access your BT.com email account, follow these simple steps:
Visit the official BT login page.
Enter your BT email address (e.g., [email protected]).
Type your password.
Click “Sign In” to enter your email inbox and start managing your emails.
If you face issues logging in, click “Forgot Password” to reset your login credentials.
Troubleshooting Common Issues with BT.com Email
If you're unable to log into your BT.com email account or facing other issues, here are a few solutions:
Forgot Password: Click the “Forgot Password” link on the login page to reset it securely.
Account Locked: After several incorrect login attempts, your account may be temporarily locked. Wait for a few minutes or contact BT support if the issue persists.
Email Not Syncing: Check your internet connection, ensure correct IMAP/POP settings, and make sure your mobile or desktop client is properly configured.
How to Secure Your BT.com Email Account?
Here are several ways to secure your BT.com email account and protect it from unauthorized access:
Enable Two-Factor Authentication (2FA): This provides an extra layer of security by requiring a code sent to your mobile device to log in.
Use a Strong Password: Create a unique and complex password with a combination of uppercase and lowercase letters, numbers, and symbols.
Monitor Account Activity: Regularly check your email account for any unusual or unauthorized activity. If you spot anything suspicious, change your password immediately.
FAQs About BT.com Email
Q1: How can I access my BT.com email on my smartphone? A1: You can download the BT Mail app or manually configure your BT.com email account in mobile email apps like Gmail, Outlook, or Apple Mail using IMAP or POP settings.
Q2: What should I do if I forget my BT email password? A2: Go to the BT login page, click on “Forgotten password?”, and follow the prompts to reset your password securely.
Q3: How can I filter spam in BT.com email? A3: BT automatically filters out most spam emails, but you can manually adjust your spam filter settings in the Account Settings to be more strict or customize your preferences.
Conclusion:
BT.com email provides an efficient and secure platform for managing your emails. Whether you're using it for personal or business purposes, knowing how to access your account, troubleshoot common issues, and secure your login credentials is essential. By following this guide, you can easily manage your BT Mail account and protect it from unauthorized access. Stay connected, stay secure, and make the most out of your BT.com email experience.
0 notes
Text
Free Methods to Convert OLM Files to PST for MS Outlook in Easy Steps

Method 1: Manual Export Using an IMAP Account
This method requires configuring an IMAP account, such as Gmail, to act as an intermediary between Mac Outlook (OLM) and Windows Outlook (PST).
Step-by-Step Process:
Set Up an IMAP Account:
Open Gmail, go to Settings > Forwarding and POP/IMAP, and enable IMAP.
Open Mac Outlook, navigate to Outlook > Preferences > Accounts.
Add a new account by entering the IMAP account credentials.
Synchronize OLM Data with IMAP:
Create a new folder within the IMAP account in Mac Outlook.
Drag and drop your emails from Mac Outlook to this IMAP folder to start syncing.
Access Data from Windows Outlook:
After the sync is complete, open Windows Outlook.
Add the same IMAP account to Windows Outlook. You should now see all your emails synced.
Move emails from the IMAP folder to a new PST file by navigating to File > Open & Export > Import/Export and selecting Export to a file.
Method 2: Export Methods Using Microsoft 365
If you have a Microsoft 365 subscription, you can use it to transfer emails between Mac Outlook and Windows Outlook.
Steps to Follow:
Configure Mac Outlook with Microsoft 365:
Open Mac Outlook and set up Microsoft 365 as a new account under Preferences > Accounts.
Drag and drop OLM data into the Microsoft 365 mailbox.
Access Data on Windows Outlook:
Log into your Microsoft 365 account in Windows Outlook. All OLM data should now be available in the Microsoft 365 mailbox.
Copy these emails to a PST file in Windows Outlook to complete the conversion.
Method 3: Exporting via Apple Mail and Importing to Windows Outlook
To migrate Apple Mail to Windows Outlook, first export emails from Apple Mail as MBOX files. Then, use an MBOX to PST converter to convert the files.
This method is more involved and ideal if you need to convert only a few emails or folders.
Instructions:
Export Emails from Mac Outlook: Open Mac Outlook, select the emails or folders you want to export, and export them to .mbox format.
Import MBOX to Apple Mail: Open Apple Mail, go to File > Import Mailboxes, and select the MBOX file. This will load your Mac Outlook emails in Apple Mail.
Use EML Format to Save Emails: Drag each email from Apple Mail to a new folder to save them as .eml files.
Import EML Files into Windows Outlook: Open Windows Outlook, and use a third-party tool to import EML files into PST format, as Outlook does not natively support EML to PST conversion.
Method 4: Using an OLM to PST Converter Tool

Many professional OLM to PST converter tools offer free demo versions, which can be used to convert a limited number of emails or files.
Download a Free OLM to PST Converter: I have explain some best OLM to PST converter tool that offers a demo version (e.g., SysVita OLM to PST Converter, ATS OLM To PST Converter & Vartika OLM to PST Converter).
1. SysVita OLM to PST Converter
Description: SysVita OLM to PST Converter efficiently converts Mac OLM files to PST format, supporting bulk exports with all versions of Outlook and Windows. The software also allows for conversion to multiple formats like MBOX, EML, MSG, and supports direct export to IMAP and Office 365.
Pros:
Bulk export support.
Compatible with all Outlook and OS versions (Mac & Windows).
Includes a free demo version for testing.
Direct migration to IMAP & Office 365 accounts.
Cons:
Limited features in the trial version.
2. ATS OLM to PST Converter
Description: ATS OLM to PST Converter is a user-friendly tool that converts OLM files to PST, EML, MSG, EMLX, and MBOX formats. It doesn’t require Outlook installation and includes a preview feature to verify data before migration. This converter supports all versions of Outlook, from 2000 to 2021.
Pros:
Supports multiple formats: PST, MBOX, EML, MSG.
Preview feature for data verification.
No Outlook installation required.
Free demo for testing, with up to 30 items converted.
Cons:
Limited options in the free version.
3. Vartika OLM to PST Converter
Description: Vartika OLM to PST Converter is designed to convert OLM files from Mac to PST format for Windows Outlook users. This tool also supports conversion to formats like EML, MBOX, MSG, and Office 365. It includes advanced filtering to help you select specific data.
Pros:
Multi-format conversion options.
Advanced filtering for selective migration.
Direct export to Office 365 and Live Exchange.
Allows preview of email items before conversion.
Cons:
Limited options in the free version.
Each converter has unique strengths, so choosing the best one will depend on the volume of data, preferred formats, and additional migration options like direct IMAP or Office 365 compatibility.
Convert OLM to PST Using the Tool: Using a dedicated OLM to PST conversion tool is often the fastest, most reliable method, especially if you have a large number of files to convert. Here’s how to use an OLM to PST converter tool to seamlessly convert your Mac Outlook files to a format compatible with Windows Outlook.
Step-by-Step Guide:
Download and Install a Reputable OLM to PST Converter Tool:
Begin by choosing a well-rated tool with a free trial version, such as SysVita OLM to PST Converter, ATS OLM Converter, or similar.
Install the software on your Windows computer by following the setup prompts.
Launch the Tool and Import the OLM File:
Open the converter software and look for an option like Add File or Open.
Select the OLM file you wish to convert. Many tools also allow you to preview the contents before proceeding.
Choose PST as the Output Format:
In the export options, select PST as the desired output format. You may also be able to configure additional settings, such as preserving folder structure, filtering emails by date range, or converting only specific folders.
Select the Destination Folder:
Specify where you’d like the converted PST file to be saved on your system.
Begin the Conversion Process:
Click Convert or Export to start the process. The time required will depend on the size of the OLM file and the speed of your system.
Open the Converted PST File in Windows Outlook:
Once conversion is complete, open Microsoft Outlook on your Windows system.
Go to File > Open & Export > Open Outlook Data File, locate your newly converted PST file, and import it.
Conclusion
Converting OLM to PST manually can be a time-consuming process, especially for larger files. While free methods are available, they require multiple steps and some technical knowledge. If you regularly need to convert OLM files to PST, investing in a professional OLM to PST converter might be worth considering for a seamless experience.
#news#technology#olmtopst#OLMtoPSTConversion#hashtag#FreeOLMtoPSTMethods#ConvertOLMFiletoPST#MSOutlookOLMConversion#MacOutlooktoWindowsOutlook#IMAPOLMtoPST#Microsoft365EmailMigration hashtag#AppleMailtoOutlook#FreeOLMConverterTools#OLMtoPST hashtag#Step-by-Step hashtag#Guide
0 notes
Text
If you want to import MBOX files into Gmail, it’s not directly supported by Gmail. However, you can use a few workarounds to get it done. Below are the some steps you can follow to successfully import your MBOX files into Gmail format.
Method 1: Using Thunderbird and Gmail IMAP
This is a free and effective method to transfer MBOX files to Gmail using the Thunderbird email client.
Steps:
Install Thunderbird: Download and install Thunderbird on your computer.
Set Up Gmail in Thunderbird:
Open Thunderbird and go to Account Settings.
Click Account Actions and select Add Mail Account.
Enter your Gmail login details and configure it using the IMAP protocol.
Install ImportExportTools NG Add-on:
In Thunderbird, go to the menu and click on Add-ons.
Search for ImportExportTools NG and install it.
Restart Thunderbird to activate the add-on.
Import MBOX Files:
After installing the add-on, right-click on your Gmail inbox in Thunderbird.
Select ImportExportTools NG > Import MBOX file.
Browse to your MBOX file and import it into Thunderbird.
Drag Emails to Gmail Folder:
Once the MBOX emails are imported into Thunderbird, simply drag and drop them into your Gmail folder.
Thunderbird will sync the emails to your Gmail account over IMAP.
Method 2: Using WebbyAcad MBOX to Gmail Converter
If you want a quicker and more direct method, using a dedicated tool like WebbyAcad MBOX to Gmail Converter can simplify the process. Here's how you can use it:
Steps:
Download and Install WebbyAcad MBOX to Gmail Converter: Download the software and install it on your computer.
Add MBOX Files: Launch the tool and click on Add Files to select your MBOX files.
Log in to Your Gmail Account: The converter will ask you to enter your Gmail login credentials securely.
Start Conversion: Once logged in, click on Convert and the software will automatically import the MBOX files directly into your Gmail account.
Method 3: Using Google Takeout (For Backups)
If you’re looking to restore MBOX files that were originally downloaded via Google Takeout, follow these steps:
Extract MBOX Files from Google Takeout: If you’ve backed up your Gmail using Google Takeout, extract the MBOX files from the Takeout archive.
Use Thunderbird: Follow the same steps in Method 1 to import these MBOX files back into Gmail.
Conclusion
To import MBOX files into Gmail, using Thunderbird with the Gmail IMAP setup or a dedicated tool like WebbyAcad MBOX to Gmail Converter are the most straightforward options. These methods ensure your emails are transferred safely and efficiently.
1 note
·
View note
Text
Several days later, all 20 years of emails — 117,006 messages at 11 gb — have been imported to iCloud. After setting up mail forwarding, I no longer need to keep Gmail in Mail via IMAP because it’s all searchable. Delayed retrieval is also solved by forwarding. Perhaps the most boring post ever.
0 notes
Text
1877(698)-1665- How do I fix my Gmail not receiving emails?
Gmail is one of those things that almost everyone has in common; Whether you use a Mac, PC, iPhone, or Android, work from home, or go to a corporate office, there's a good chance you have at least one Gmail account. And that means you almost certainly encountered some kind of glitch that caused Gmail to not work properly.
There are many possible reasons why Gmail might have stopped your morning email check, but the good news is that there are some simple things you can do to reduce the problem and get you back up and running.
How to fix Gmail not receiving emails?
Are you connected to the internet?
Anything in the junk folder?
Is it in the trash?
Check all mail
How’s your storage limit?
Go over your filter settings
Check email forwarding
Is Google down?
Send a test email to yourself
Are you using an email client?
Check POP/IMAP
Change browser or device
Gmail update?
Try logging out and logging back in
Let’s do that together:
How to Fix It When Gmail Isn't Working on Android
Follow these steps in the order below, starting with the easiest and most relevant solutions first 1877(698)-1665.
Close and reopen Gmail
If Gmail isn't working, often all you need to do is simply close your Gmail instance and reopen it. If you're in a web browser, close it, reopen it, and return to the Gmail website. If you are on a mobile device, close the app and restart it.
Try Gmail in another browser
The next easiest way to fix the problem is to try Gmail in another browser. If you usually use Chrome, for example, open Gmail in Firefox and see if it works there. If so, figuring out why it's not working in Chrome may be something you'll have to figure out another time, but at least you'll be able to get on with your day. Likewise, if it doesn't work on the mobile app, switch to a browser and see if you have a better experience there.
Check if Gmail is down
The problem may not be with your computer or browser, but rather the Gmail service may be offline. To find out, you can check Gmail's network status on Downdetector or search for "Is Gmail down" in a Google search? If there is a service interruption, you will need to wait for it to be resolved.
You might run into some issues with Gmail if you also run out of storage space on your Google Drive account, since Google Drive is where your Gmail is stored. Check if you are running out of space and free up space if necessary.
Make sure you have a solid internet connection
This may seem obvious, but also make sure you have a reliable internet connection, whether via WiFi or cellular. For example, your home Internet connection may be disconnected, but the WiFi is still strong. Your mobile device may be trying to connect via WiFi, but no data is being transmitted. To check, see if other apps or websites are not working correctly. If you're on a mobile device, you can also turn off WiFi and force your device to use a cellular signal.
Restart your computer
If you still don't succeed, turn off your device, whether it's a computer, Android phone, or iPhone, and then restart it. Then try Gmail again. Sometimes restarting your device is what is needed to fix problems in memory or with an app or browser.
Disable your browser plugins
If the problem with Gmail seems to be limited to a particular web browser, there is a good chance that you are using a browser extension or add-on that conflicts with Gmail. The good news is that it's easy to disable your extensions and see if that solves the problem. Disable all your extensions (here's how to disable extensions in Chrome) and see if that fixed the problem. If so, you can try to turn them back on, one at a time, until you find the problematic extension that conflicts with Gmail.
Clear your browser cache
Lastly, your browser's cache may also be preventing Gmail from working properly. To test this, try clearing your browser's cache and cookies. Here's how to clear the cache and cookies in Chrome, for example, and if you're using an iPhone, uninstall the Gmail app and then reinstall it from the App Store. If you are using an Android device, the steps may vary depending on the phone and version of Android you are running, but this is the general procedure:
1. Start the Settings app.
2. Tap Apps & Notifications.
3. Go to the list of apps (you might need to tap See all apps) and tap Gmail.
4. Tap Storage & cache.
5. Tap Clear cache.
Conclusion
There can be several reasons why Gmail is not receiving emails. Some possible causes include internet connectivity issues, accidentally deleted or trashed emails, issues with external email clients, or technical issues with the device or browser you are using to access your email. By reviewing each step of our guide, you will be able to quickly identify where the problem is coming from.
Google Mail is not working help center { Contact 1877(698)-1665 Help Desk}
0 notes
Text
about Gmail
Certainly! Gmail is a popular email service provided by Google. It allows users to send, receive, and manage emails using their Google account. Here are some key details about Gmail:
Features: Gmail offers a range of features, including a user-friendly interface, large storage capacity, advanced spam filtering, and organization tools like labels and folders.
Email Management: You can compose, send, and receive emails with attachments such as documents, images, or videos. Gmail also supports email forwarding and the ability to set up email signatures.
Storage: Gmail provides generous storage space for emails and attachments. As of my last update in September 2021, it offered 15 GB of free storage shared across Gmail, Google Drive, and Google Photos. Additional storage can be purchased if needed.
Security: Gmail uses encryption to protect your emails and data during transmission. It also includes spam and malware filtering to keep your inbox safe.
Search and Filters: Gmail has a powerful search function that allows you to find specific emails quickly. You can also create filters to automatically organize incoming emails based on certain criteria.
Integration: Gmail integrates with other Google services like Google Calendar, Google Meet, and Google Tasks, making it easy to manage your schedule and collaborate with others.
Accessibility: Gmail can be accessed through a web browser on various devices like desktops, laptops, smartphones, and tablets. Additionally, it supports IMAP and POP protocols, allowing you to access your emails through third-party email clients.
Please note that some features or details might have been updated since my last knowledge update in September 2021. However, the core functionality of Gmail remains largely the same. If you have specific questions or need more detailed information, feel free to ask!
1 note
·
View note
Text
Steps to Access Gmail on iPhone and Androids
Gmail is the king of Emails tools. Gmail IMAP and POP settings plays and important role in setting up Gmail in phones. Read this blog to know about the important steps that you can follow to Setup Gmail account on your phone.
#access gmail on iphone#setup gmail on iphone#gmail imap settings#gmail pop settings#gmail smtp settings
2 notes
·
View notes
Video
youtube
Gmail to Outlook | Setup Gmail in outlook 2016
#outlook 2016 won't connect to gmail#setup gmail in outlook 2019#g suite email setup#setup gmail in outlook 2010#gmail smtp settings#gmail imap settings#how do i sync my gmail with outlook?#google migration tool download#gmail to outlook#gmail tools#setup gmail in outlook 2013#sync outlook 2016 with gmail
0 notes
Text
Gmail imap account settings for outlook 365

Gmail imap account settings for outlook 365 how to#
Gmail imap account settings for outlook 365 password#
Gmail imap account settings for outlook 365 download#
Gmail imap account settings for outlook 365 free#
If after using Outlook for a little while it seems like you aren’t getting your messages fast enough, then you might need to change another setting.
Gmail imap account settings for outlook 365 password#
Step 5: Go back to the Google window from earlier, copy the app password, then paste it into the Password field and click Connect. Step 4: Type your Gmail email address into the center field, then click the Connect button. Step 2: Click the gear icon at the top-right of your inbox, then choose the Settings option. Step 1: Navigate to and sign into your Gmail account. Therefore, you are going to need to begin here by turning it on. By default, the IMAP setting in Gmail is not activated.
Gmail imap account settings for outlook 365 download#
This is the first step in ensuring that Outlook is able to connect to your account to download and send messages. Enabling IMAP in Your Gmail Account (Guide with Pictures) If you have Gmail set up and working, then you might be interested in this article on adding a picture to your Outlook signature. Our article continues below with sections to address the various scenarios you might encounter when setting up your Gmail account in Outlook. Microsoft 365 Outlook might not even be able to make the initial connection depending on your Gmail account settings. It’s entirely possible that your Gmail in Outlook setup won’t be working immediately after following those steps above. Note that there are several variables which can affect your ability to add Gmail to Outlook 365, such as your current Gmail settings and whether or not you already have an email account set up in Outlook.
Enter your Gmail address, then click Connect.
Gmail imap account settings for outlook 365 how to#
Before you can launch Outlook and add the account, however, there are a couple of things that you need to take care of in your Gmail and your Google Account first.Ħ See also How to Add a Gmail Account to Outlook 365 If you are trying to access Gmail on your desktop computer in the Outlook application, then it is possible for you to do so. This flexibility, along with its Web client that is also very customizable, makes it a terrific solution for many situations.
Gmail imap account settings for outlook 365 free#
Gmail is one of the most popular free email providers in the world, and many of the people that have a Gmail account will eventually want to access that email on their computer or their mobile phone. This popularity means that using Gmail in Outlook is also a common setup, so adding your Gmail account to Microsoft’s mail application can be helpful information to have. The Gmail service is popular both for individuals and businesses, as it offers a consistent, reliable service that is compatible with most devices and applications. Now Outlook will get all the emails from your Gmail account.You may want to add a Gmail account in Outlook for Office 365 if you are using it for work or on your personal computer. Select the folder Click on ‘ Send/Receive‘ in the toolbar. After setting up account as above, you will see a new folder created with your Gmail account name.After the test, click on Finish button.If you have enabled ‘ Test account settings‘, it will try to test your account settings by trying to send email. Tick the check button ‘ My outgoing server(SMTP) requires authentication‘. Now enter the port numbers for IMAP and SMTP servers as shown below. Now you need to enter the Gmail mail server details here.Tick the check button ‘ Manually configure server settings for additional server types‘.Now enter your email id and other details as shown below.In the Info tab, click on ‘Add Account’ button.Setup IMAP for Gmail account in Outlook 2010. The next step is to configure Outlook 2010 to access your gmail account. Login to your Gmail account and go to options ->Mail Settings.
0 notes
Text
youtube
How to setup business email in Hostinger 2025 ?
o set up a business email in Hostinger in 2025, follow these steps:
Step 1: Login to Hostinger
Visit Hostinger's website and log in to your account.
Navigate to the hPanel (Hostinger's control panel).
Step 2: Access Email Accounts
In the hPanel, go to the Emails section.
Click on Email Accounts under the hosting plan you want to use.
Step 3: Create a New Email Account
Click the Create Account button.
Fill in the required fields:
Email Address: Enter your desired email address (e.g., [email protected]).
Password: Set a secure password for the account.
Click Create to finalize.
Step 4: Configure DNS Settings (if required)
If your domain is not managed by Hostinger, update the DNS settings:
Go to your domain registrar's control panel.
Update the MX records to match Hostinger's settings:
MX Record: mx1.hostinger.com (priority: 10)
MX Record: mx2.hostinger.com (priority: 20)
Step 5: Access Your Business Email
Return to the Email Accounts section in the hPanel.
Use the Webmail button to access your email directly.
Alternatively, set up your email on a third-party email client (e.g., Outlook, Gmail) using the IMAP/SMTP settings provided by Hostinger.
Step 6: Optimize and Secure Your Email
Enable Two-Factor Authentication (2FA) for enhanced security.
Use email filters and autoresponders to streamline communication.
Monitor your email usage and storage from the hPanel.
Optional: Set Up Email Forwarding
If you want emails sent to this account to also reach another inbox:
Go to Email Forwarding in the hPanel.
Add the destination email address.
0 notes
Photo

Here we deliver the precise solution on how to Setup SMTP and IMAP Settings for Gmail and Server Settings. First set the server name and then follow the Steps.
0 notes